There are millions of ways to modify your out of the box gunpla kit. The ever growing aftermarket for add on metal thrusters, LED gimmicks, resin weapon packs, and various other detail up parts help make it very easy to separate your kit from the box stock version. For the article, I will discuss and show a few techniques on adding small modifications to your kits.
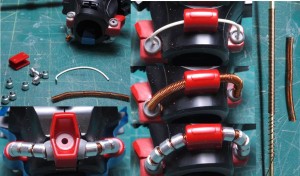
A very simple mod is the replacement of existing parts on the kit. For this example, I’m replacing the waist cables for the HGUC Sazabi. I found that the cables were rather boring and lacking in detail. So the cables were thrown away completely and a new one was built from scratch. The new cable is assembled from plastic wrapped wiring, adlers nest armor collars, a spring created from wrapping 28 gauge magnet wire around a 1/8 inch brass rod, and some round molds from wave.
The first thing I did was to glue the round molds to the front and back waist areas where the original cables terminated. Once the parts set, I drilled small holes on each end. The plastic wrapped wired is used as the main cable internal structure. This gives the cable an internal skeleton to help support the rest of the cable components. With the internal wire measured, cut and shaped, the magnet wire spring is threaded. This is followed by threading the metal collars. The internal wires terminate inside the drilled out holes keeping everything in place. Once the kit is painted, these wires are glued into place with epoxy glue. This is a very simple mod that adds a bit of detail to the otherwise bland original part.
The next modification requires a bit more planning and some more work. Putty, priming, and sanding will need to be repeated a few times for these types of modification. Feeling that the Sazabi’s fuel tanks were a little on the short and stubby side; this modification aims to lengthen the tanks. This technique can be used to lengthen any gunpla piece.
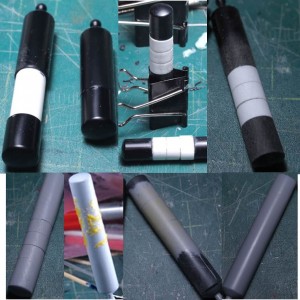
Starting off with the planning. I found a piece of styrene tube that was as close to the diameter of the original Sazabi tanks. They were a little thinner than the tanks. I drilled out both internal areas of the original tank pieces. Next I measured out the tubes and cut two sections in the same length. Additionally, I cut to thinner tubes slightly longer than the previous set to act as an internal contact and glue point for the two ends of the tank pieces as well as the center tube piece. Gluing all three of these pieces, the tank end pieces are glued using epoxy glue for maximum strength. The middle tube is glued as well. This assembly is then left to set up over night.
With the glues set, I wrapped stripes of styrene around the center part of the extension tube, and the thickness of the styrene strips was just enough to level out the difference in thickness between the extension tubes and the tank ends. These stripes were glued together using styrene glue, clamped down and left to cure over night.
Once the glue is set, the entire assembly is roughly sanded, then primed to show all the areas that need putty attention. With the primer cured, putty (in my case, light curing putty) is used to fill in the defect areas, then the entire tank piece is sanded smooth for another layer of primer to check the fix. Several cycles of priming, putty, and sanding will continue until the part looks like a single piece cylinder.
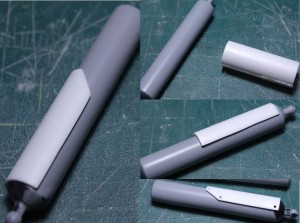
This is the basics to lengthening any part. Now with the tanks lengthened, I felt that they needed some additional details, so I cut a large styrene cylinder in half and used the halves as detail pieces for the tanks. This type of modification is commonly done by many modelers when they want to add in raised surface details to their kits. Styrene plates, cylinders, tubes, strips, etc are simply cut to a measured size and shape, then glued onto the surface. It is very simple, yet adds a great amount of surface detail to some rather bland areas in some kits.
The tubes are cut. The lower corners are also cut to add a little cosmetic flavor. Holes are drilled at the angle points to add more details and the styrene tube halves are glued into place. Once painted, the modified tanks are beefier and more stylized than the original small tanks. Again, cut rods, strips, plates, etc glued over bland surfaces add a great amount of detail and is a very simple way of pumping up the surface details.
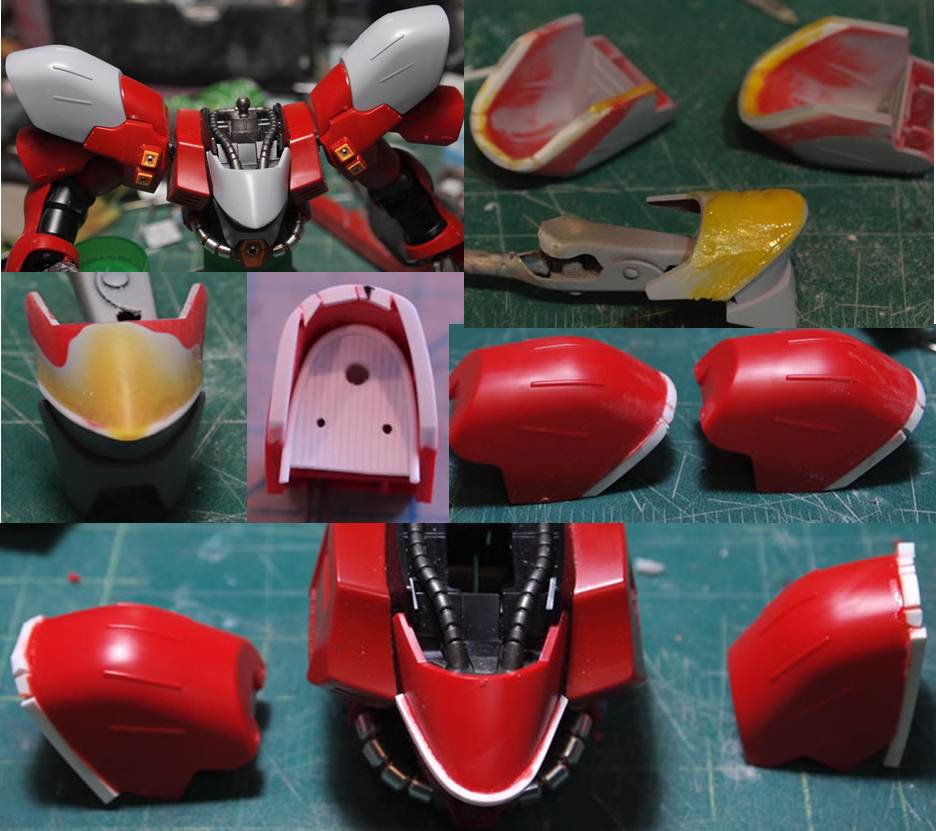
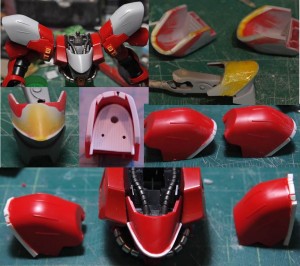
The next modification is similar to the tank extension in that additional plastic is glued to the surface of the original kit parts. For this technique, I am extending the length of the Sazabi’s shoulders as well as reshaping the chest piece slightly. For the shoulders, a strip of styrene is glued onto the ends of the Sazabi shoulders. Once the glue sets, the excess plastic areas are cut and sanded down. Putty is applied to the gap areas and then sanded smooth. The shoulders are primed to check for mistakes and the cycle of prime, putty, sand repeats itself until the shoulder pieces look complete.
For the chest, thin strip of styrene was glued along the main ridge of the chest. The styrene will be the main frame work for the putty and the ultimate reshaping of the part. With the glue set, putty is applied to the frame following the contour of the original part. Once the putty cures, the area is sanded. This sanding process shapes the putty around the frame work to create a beefier and more pronounced shape to the chest piece. Again, the process of primer, putty, sanding is repeated until the chest piece is free of defects. Reshaping and lengthening mods are quite simple if you break down the steps and understand the repeated process of priming, putty, and sanding. Modelers use these techniques to fix proportion issues and various other aesthetic cues.
Adding lights to models has been done for years. Most MG kits are very suitable for lighting mods. Lighting mods require a great amount of planning. Cutting and modifying parts will result in losing the part if the proper precautions or planning measures were not fully thought out. Each model is different so the approach to adding lights will differ greatly. For this example, I added lights to the HGUC Sazabi shoulder thrusters.
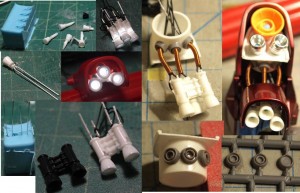
These thrusters are very small. My original idea was similar to the other lighting mods I did for the other, much larger thrusters on the kit. Drill through the back and through the thruster bell base; then insert the LED. This was not going to work, even with the smallest LEDs I could find. Cutting into the thruster didn’t work either. I ended up completely ruining one of the arm thrusters. So back to the planning.
The remaining thruster piece was used to make a silicone mold. The thruster bells were cut from the destroyed arm piece and the thruster bells were molded in silicone and resin cast. These resin cast thruster bells were then drilled and 1.8mm LEDs were glued into the thruster bells. The ends of the resin thruster bells were capped with sticky tack to protect the LED bulb, then placed into the mold of the entire thruster assembly. With the LED and thruster bell inside the mold, resin is poured to create a custom thruster assembly that have LEDs embedded within the part.
Some work to hide the wiring using wave ring molds and springs made from magnet wires compete the modification. The entire process took several days, but the time spent planning and executing each step was totally worth the effort. This is a fairly extreme level of LED modification. What I had hoped to illustrate is that you can go beyond drilling and cutting into the original parts and completely fabricate the necessary parts for the job.
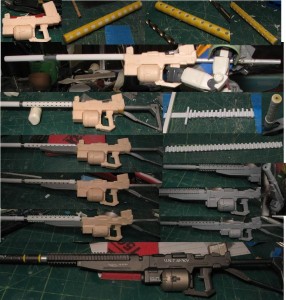
The next technique is a gun modification that boarders on scratch building. For this, a base part is used as a start point for which something completely different is built. I didn’t care for the sniper rifle that came with the GM Sniper. So starting with a resin ore gun from Akocreation, I added styrene tubes, stripes, brass and aluminum tubes , and parts for various kits, a custom made sniper rifle is created.
Starting off with the front and back of the original resin ore gun. The front barrel is drilled and a styrene tube is fitted as the main barrel. The back was drilled and an aluminum rod is added as the base for a rifle stock. Another hole was drilled in the center of the larger hole on the ore gun’s front barrel. An thinner aluminum rod is inserted as the main rifle barrel. The outer styrene barrel was cut into two sections, one for an outer barrel piece and the other for a silencer piece.
Starting with the outer barrel; a pattern traced out with strips of masking tape is laid along the four sides of the barrel. A drill is used to cut holes along the masking tape pattern. With the masking tape removed, we have a ported outer barrel. Next, a rail system is created using styrene strips. Three copies of the created rail are made. The outer barrel is fitted over the inner barrel. A metal collar is threaded and used to separate the outer barrel from the silencer. Small dents are made into the silencer to mimic the socom style silencer.
The aluminum rod on the stock end is cut and the back piece of a MG Kampfer shotgun stock is glued into place. At this point the rifle has a barrel and a stock but there was still something not quite right about the weapon. The fore grip of the original sniper rifle was cut and glued to the bottom of the barrel and front of the ore gun. This worked to create a more rifle like look. A styrene strip is added to the top of the outer barrel connecting to the fore grip. Putty is used to fill in gaps and create logical transitional areas between parts.
The rail system is glued. A thin ring cut from a tube of styrene is fitted over the silencer to add some more details. The space between the inner barrel of the silencer is filled in with consecutively smaller rods and glued into place to get a centered inner barrel. Putty is used to fill in any remaining gaps.
With the rifle built from various parts, it still looks very frankenstinish. Primer is sprayed and the weapon is cleaned up along the transitional areas, putty areas, and general surface fixes. After a final coat of primer, the weapon looks more solid. Paint and decals finish the weapon. This technique bashed different kit parts together and used basic styrene building blocks to create a finished product. Everything comes together with glue, putty, and some paint.
Hopefully this tutorial has broken down some of the various styles of adding modifications to a kit to create a more customized look. There are thousands of other techniques that modelers use to customize their models, some simple and some very extensive. It all comes down to how much time you are willing to spend and the kind of modification you want to add to your kit.

